Logging water pressure with Arduino and Thingspeak
The village where I live has an issue with water pressure, it doesn't greatly affect me but the other side of the village can lose pressure quite substantially. The water company keep insisting that they are supplying the required pressure so I thought it would be good to find a way to fight their presumption with data. Data always wins in such arguments!
Here is my methodology, it might evolve and change from here but this is the first part of my exploration and I wanted to share it.
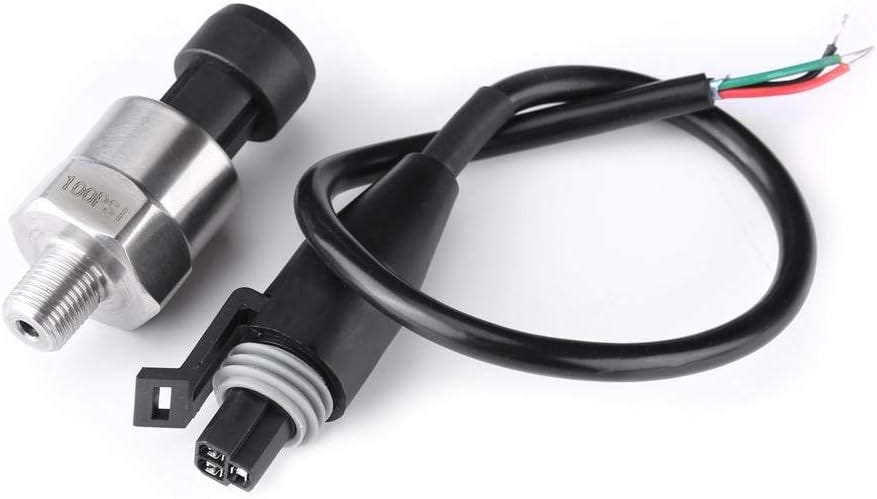
The stated minimum pressure in the UK is 1 bar which comes in around 14PSI, although it can be 3 bar (45PSI). It is also worth noting here that atmospheric pressure at sea level is around 15PSI. I looked for a pressure sensor which could measure water pressure, I found lots of relatively low cost pressure sensors "1/8 NPT Pressure sensor" and they are available with a selection of pressure ratings. I initially chose 30PSI because I wanted to accurately measure low pressure, but I found that means measuring at my house is at 100%, not great for testing! So I have also ordered a 100PSI unit for comparison.

These sensors produce an output from 0.5V to 4.5V with a 5V supply, the 4V range is equal to the full range from 0 PSI to maximum (e.g. 30PSI or 100PSI). So I need an analogue to digital converter that can handle 5V inputs, this is important.
My next step was to look what WiFi micro-controllers I have in my toolbox, I have plenty of ESP8266 modules that I have acquired over the years. My first attempt was with a NodeMCU because it fit nicely into my breadboard for quick development, I have an ESP-01 as well which I want to use up so that may come into the production design. I haven't actually done much with Arduino before so I decided to do a test run with just lighting an LED to prove I had everything working. Then I tested reading A0 which is the analogue input and that worked, writing out to the serial port. I then attached the sensor but using a 3.3v supply (from the NodeMCU).
The A0 analogue input read just over 100 and when I blow hard on the input it comes out at about 160, so that's great, I am reading something and it's useful.
I then took a look at what IoT platform I wanted to send this to. I have a soft spot for MQTT but I elected to not bind myself too tightly. I was about to do it with AWS IoT, but that looked a little complex for this simple use case. While looking deeper I found ThingSpeak has a free, non-commercial, tier for 3m data points and four channels, so that should be enough for our needs.
I heavily modified the ThingSpeak reference sketch and here is my first draft. I should say that there are some things that were wrong with that sketch that still aren't fixed in here, notably the WiFi parameters are a bit weirdly arranged and I will fix that in the end.
/*
ESP8266 --> ThingSpeak Channel

This sketch sends the Wi-Fi Signal Strength (RSSI) and A0 of an ESP8266 to a ThingSpeak
channel using the ThingSpeak API (https://www.mathworks.com/help/thingspeak).

Requirements:

* ESP8266 Wi-Fi Device
* Arduino 1.8.8+ IDE
* Additional Boards URL: http://arduino.esp8266.com/stable/package_esp8266com_index.json
* Library: esp8266 by ESP8266 Community
* Library: ThingSpeak by MathWorks

ThingSpeak Setup:

* Sign Up for New User Account - https://thingspeak.com/users/sign_up
* Create a new Channel by selecting Channels, My Channels, and then New Channel
* Enable one field
* Enter SECRET_CH_ID in "secrets.h"
* Enter SECRET_WRITE_APIKEY in "secrets.h"

Setup Wi-Fi:
* Enter SECRET_SSID in "secrets.h"
* Enter SECRET_PASS in "secrets.h"

Tutorial: http://nothans.com/measure-wi-fi-signal-levels-with-the-esp8266-and-thingspeak

Created: Feb 1, 2017 by Hans Scharler (http://nothans.com)
Modified: 26/08/2020 by Bob Hannent (http://www.orbit.me.uk)
*/

#include "ThingSpeak.h"
#include "secrets.h"

const int analog_ip = A0; //Naming analogue input pin
unsigned long myChannelNumber = <THING CHANNEL>;
const char * myWriteAPIKey = "<THING PASSOWRD>";
const int LED = 13; //Naming LED Pin

#include <ESP8266WiFi.h>

char ssid[] = "<SSID>"; // your network SSID (name)
char pass[] = "<PASSWORD>"; // your network password
int keyIndex = 0; // your network key index number (needed only for WEP)
int httpCode = 0;
long rssi = 0;
WiFiClient client;

int pressure = 0;

void setup() {
Serial.begin(115200);
delay(100);

WiFi.mode(WIFI_STA);

ThingSpeak.begin(client);
pinMode(LED, OUTPUT); // Defining pin as output
}

void loop() {
// Measure pressure from analogue pin.
pressure = analogRead(analog_ip);

// Connect or reconnect to WiFi
if (WiFi.status() != WL_CONNECTED) {
Serial.print("Attempting to connect to SSID: ");
Serial.println(SECRET_SSID);
while (WiFi.status() != WL_CONNECTED) {
WiFi.begin(ssid, pass); // Connect to WPA/WPA2 network. Change this line if using open or WEP network
Serial.print(".");
delay(5000);
}
Serial.println("\nConnected.");
}

if (WiFi.status() == WL_CONNECTED) {
analogWrite(LED, pressure/4);
}
else {
analogWrite(LED, 0);
}

// Measure Signal Strength (RSSI) of Wi-Fi connection
rssi = WiFi.RSSI();

ThingSpeak.setField(1, (int)pressure);
ThingSpeak.setField(2, (long)rssi);

// Write value to ThingSpeak Channel
httpCode = ThingSpeak.writeFields(myChannelNumber, myWriteAPIKey);

if (httpCode == 200) {
Serial.println("Channel write successful. RSSI:" + String(rssi) + " Pressure:" + String(pressure));
}
else {
Serial.println("Problem writing to channel, field 1. HTTP error code " + String(httpCode));
}

// Wait 60 seconds to update the channel again
delay(60000);
}
This works great and logs to ThingSpeak fine for me, it also outputs to Serial for logging purposes. Now, next steps:
The sensor is powered by 3.3V and I am not sure what that's doing to its range.
I have ordered some AD7705 ADCs which are 5V tolerant which should help.
Plugging the sensor into a tap it went to 100% straight away, so either 3.3v is the issue or the pressure is.
The ADC should help and I have ordered a 100PSI sensor as well.
Check back for more progress and comment with any suggestions or questions.
